Image Map
Showing posts with label DIY. Show all posts

Thursday, March 5, 2015

3 Steps to an Organized Closet

(**This post was originally written as a guest post over at The Grits Blog, but I am resharing it here just in case you missed it**)

Today I wanted to share a few tips on organizing your closet.  My big goal for the New Year was to be more organized, so the one place that I knew I wanted to start was in my bedroom closet, because holy cow do I have a lot of stuff in there!  I've got a pretty big shopping problem.  I tend to buy things that are on sale just because it is such a good deal, but that just means I have accumulated A LOT of stuff.  Here are the steps that I took to get an organized closet.


1.  Downsize your wardrobe (everyone's least favorite step!)

//  I find that it's easiest if you take everything out and start separating it into three piles: "Keep", "Donate", and "Toss".

//  When you have your "Keep" pile, make sure you try everything on!  Don't keep items in your closet that don't fit or that don't make you feel good.

Helpful questions to ask yourself when trying on your clothes:
- Does this item still fit my style?
- Is it damaged or stained?
- Have you worn it recently? (In the past year)
- Is it currently in style?  (If that matters to you!)
- Can you use that item in different way to make multiple outfits?

2.  Now let's put everything back in!  (I know, I'm so bossy, right?!)

//  Try keeping similar colors together, it makes finding things easier

//  Store out of season pieces in a bin on the top shelf of you closet or in a suitcase, or if you want/need the extra room send it down to the basement/storage until the season calls for it

//  Utilize space on the inside of closet doors (ex: hang scarves or belts on a tie rack)

//  Buy a shoe rack for the bottom of your closet, it makes it look way neater.

Hanging Tips:
//  For more delicate clothing use a couple pieces of tissue to separate the hanger clips from the clothing so it doesn't leave marks (photo below)

//  To prevent clothing from slipping off of the hanger, wrap a thick rubber band around the edges of the hanger.

//  If you have limited closet space you can use the "soda tab method" to double your space.  (photo below)

What to HANG:  suits, skirts, shirts  (move coats and jackets to a coat rack/closet - they take up too much valuable space!)

What to FOLD:  denim, t-shirts, sleepwear/loungewear, knitwear (if you hang knitwear it can warp the shape over time, and stretch out the shoulders)


3.  Keeping it Organized  (the easiest step!)

//  Take an extra second at the end of the day to put thing back where they belong

//  Go through your wardrobe at the end of each season.  It will keep you aware of the items that you already have (so you don't overshop, like me!) and help you make decisions on what what you still need.

I hope you found my tips helpful!  Do you have any extra tips on organizing your closet for me?

Sunday, December 14, 2014

DIY Keepsake ornament + more


This is another SUPER easy ornament idea.  If you've been around here for awhile you may remember me saying I'm a super sentimental person...and that I tend to save everything.  I kept my daughter's little hat and the bracelet from when we had her in the hospital and could never decide what I wanted to do with them.  I had them just sitting in a little shoe box for almost 2 years now.  So instead of leaving it in a box forever I decided that displaying it on our tree every year would be really cute!  Here's how I did it:

Step One: Take off the cap and start stuffing!

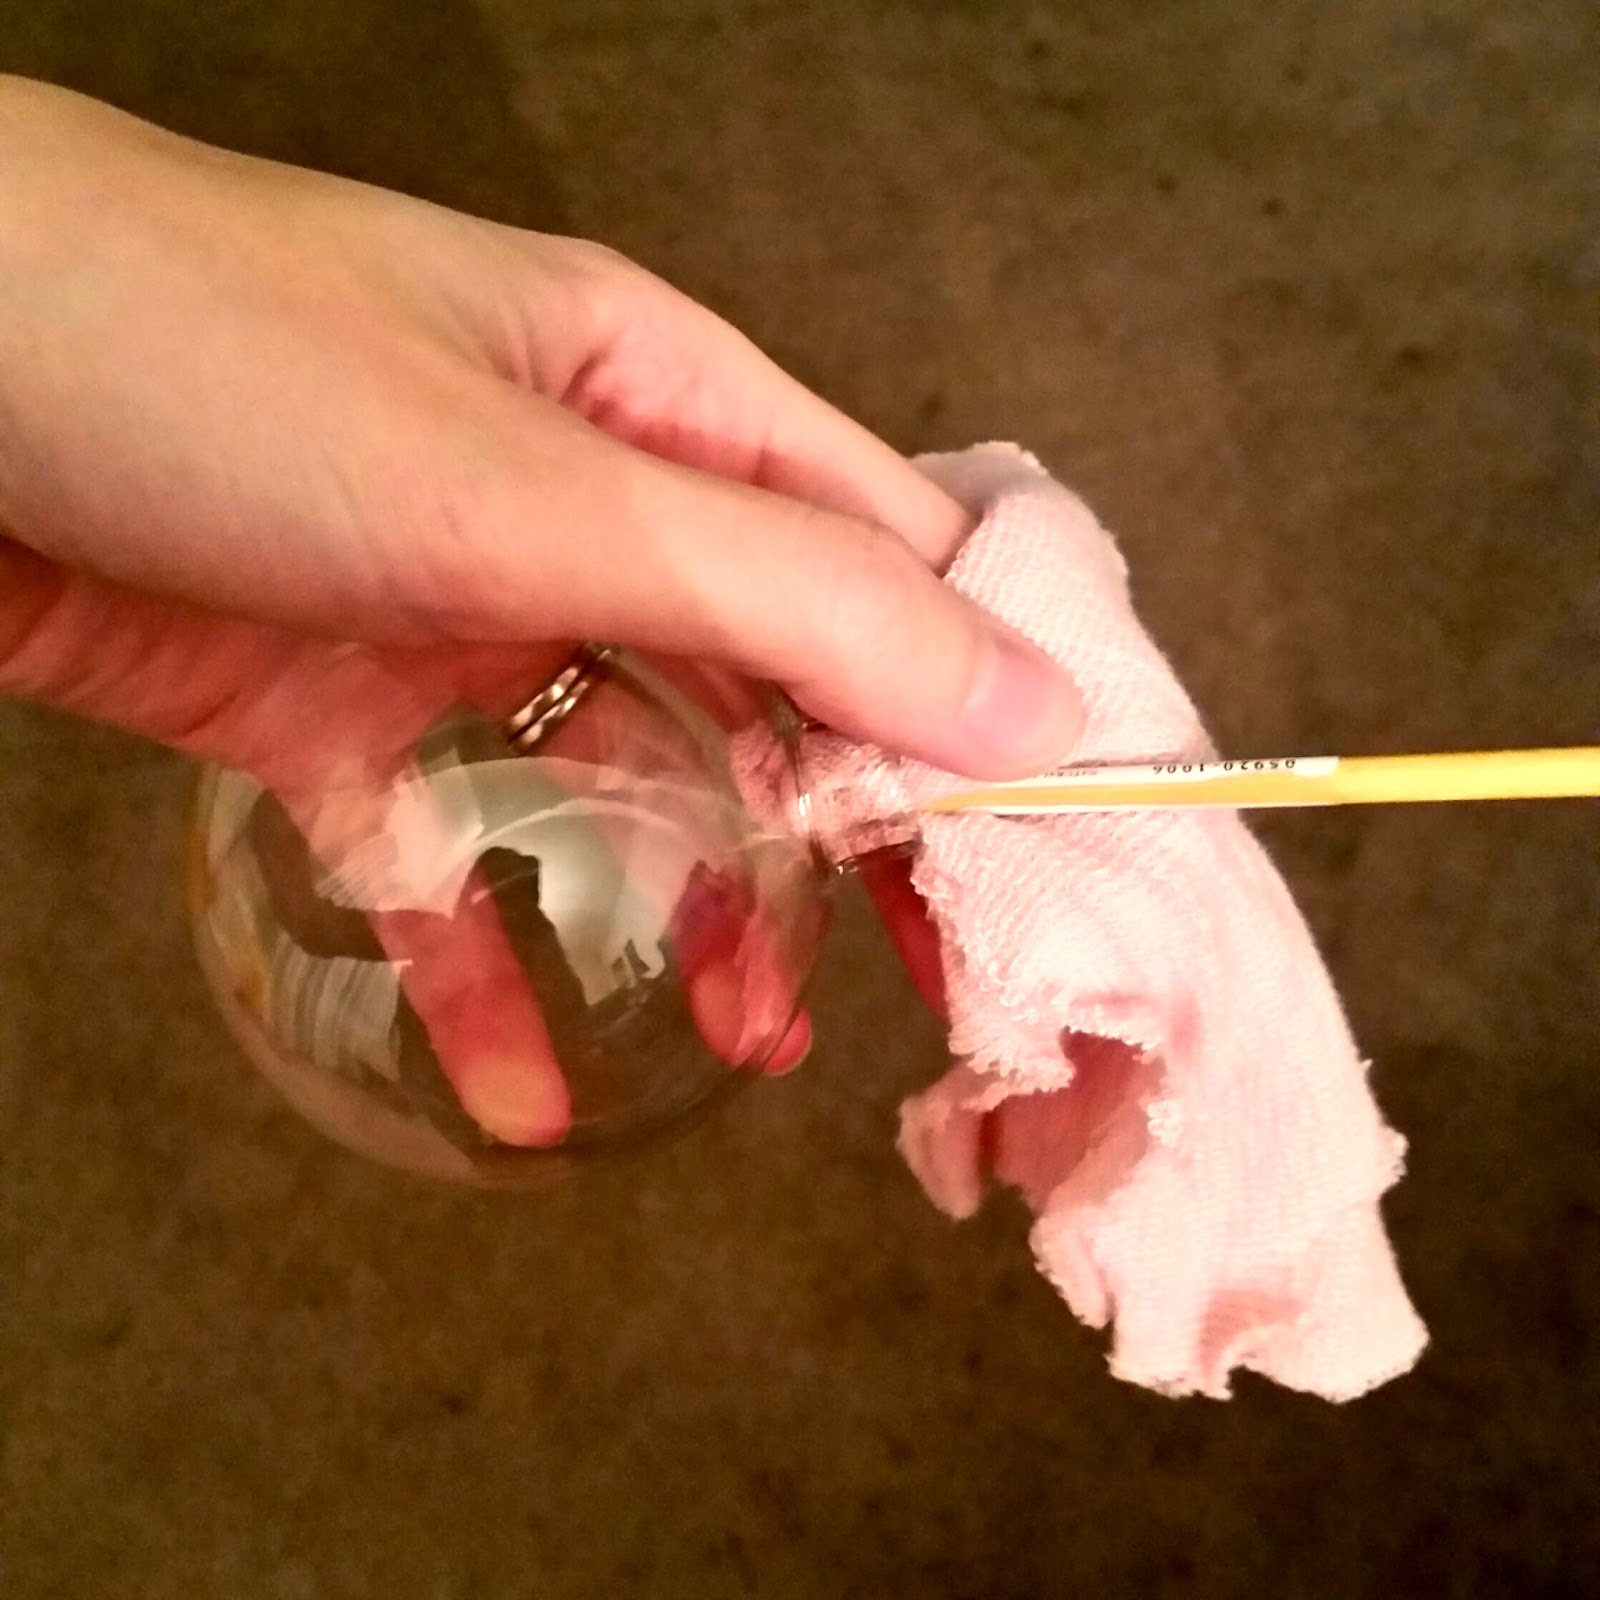
It really is just that easy.  Take off the little silver cap on the top and start pushing the hat through the open area at the top of the bulb.  I used the end of a paintbrush to push it all through.  It can get kind of tough at some points but just keep working with it.


Step Two: Add the bracelet

Once you have the hat all the way in the bulb, you can start feeding the bracelet through.  Cut it to the desired length or use the whole thing, up to you!  You can use tweezers to position it better if you don't like how it is laying inside of the bulb.

Step Three: Replace cap and add ribbon for hanging

After you get the bracelet in the the bulb you can replace the silver cap and cut a small piece of ribbon for hanging it on the tree.  Just knot it and you are all set!

AND THAT'S IT!!  Super easy, right?!  I loved the way it turned out, and it finally gives me a way to display just an adorable little keepsake.

I also did a few other super easy ornament tutorials if you want to check them out!!

Don't tell my hubby, but I've been painting some surprise ornaments for him for the tree.  He is a HUGE Star Wars/Comic Book nerd so here is what I've painted so far....   What do you think??
from top left: Yoda, Iron Man, C-3PO, Spiderman

I have a bunch more that I would like to do, but we will see what I have time to finish.

Hope you're having a great weekend!!

#Blogmas14

Friday, December 5, 2014

DIY: Mickey Mouse Ornament


I wanted to do another really simple ornament.  If you've been around here for a while then you may have heard me mention that my daughter is absolutely OBSESSED with Mickey/Minnie Mouse.  Remember when I painted those pumpkins??  Well, I decided that I wanted to make her a special little ornament to surprise her in the morning (I do my crafts after she goes to bed at night).  

This one took me only about 5-10 minutes...and most of that time was just me hunting down the few things I needed.  Don't you hate when you clean and lose track of where everything is?!  I have an organized mess, so when I finally get around to straightening up, I get so confused and forget where I put things. lol!   Anyway, here's a really easy Mickey Mouse ornament for all you Disney lovers!


Supplies needed:
Red shiny bulb
Black permanent marker
2 white buttons
Scissors
White ribbon
Elmer's Glue (Super glue would probably be even better!)

Step One: Coloring

Pick a spot just above the middle of the bulb and draw a straight line all the way around the bulb.  It's okay if it's not perfect.  Mine wasn't either!  Now, you are going to color in the entire top half of your bulb.  This will be his body.  It may be a little streaky.  That's okay!


Step Two:  Creating his "shorts"

Apply glue to the back of each button and apply them one by one just below your black section.  It's going to look a little sloppy but the glue will dry clear so don't worry too much about it.  You will need to hold them in place for a minute or so and blow on them so they "set" a little bit.  After that you can use pens/pencils to hold the bulb in place to let it dry. (see picture below)


Step Three:  Finishing touch!

The last thing you will need to do is to attach a ribbon for hanging....  and that's it!!  Not so bad right?!


If you enjoyed this post, you may also like:
DIY: Wedding Invitation Ornament

Have you ever made ornaments for your tree?

Wednesday, December 3, 2014

DIY Wedding Invite Ornament


This year I've decided that I want to start making a lot of the bulbs on our tree.  We normally have a blue, silver, and white theme but now that my little one is getting older I want to add personal ones to the tree that I can pass down to her.  I also wanted to start the tradition of making one together every year.  I have a more kid friendly one scheduled coming up, but I wanted to share an easy one first!

I'm a bit of a hoarder, so I still have a lot of our wedding (from 4 and a half years ago!) mementos and decor in boxes in the basement.  I've been trying to find ways to use some of them.  Remember my DIY Wedding Card Album??  Well, I have a bunch of wedding invites that were extra still sitting in a box and wanted to find a way to use them.  So, I got the idea to make a cute bulb.  This would also make a great Christmas present for a friend if you saved their wedding invite!


Supplies:
Wedding invite
Ribbon
Scissors
Pencil
Ruler
Clear glass bulb

Step One: Measure where you are going to cut the invitation

Flip the wedding invitation over and use your ruler to measure every half inch on top and bottom and make little dashes with your pencil.  Connect your dashes by making a straight line across.  This will be your guideline for the next step: cutting.


Step Two:  Cut and Sort

Now you are going to cut out all of your little strips.  If you have a paper cutter then use that, otherwise you can just use scissors like I did.  After you finish cutting out all of your strips, you can start pulling out the ones that you want to use.  I pulled out the pieces that captured the words that I wanted to see peaking through areas of the bulb.  Unfortunately, I can't remember how many pieces I ended up using.  Just use your own judgement.  More pieces for a fuller bulb, less for a bulb that's not completely full.


Step Three:  Curl the strips and start stuffing

Now that you have the pieces picked out that you want to use, you can start curling them.  I simply winded them, with the print facing outward, around a pencil.  Once you have it curled around the pencil, you can slide it off the end and start feeding it into the open end of you bulb.  I would do this right away so you keep the tighter curl.  Keep curling and stuffing until you have the desired amount of strips in your bulb.


Last Step: Finishing touches

Almost done!  I cut a piece of ribbon and made a bow on the front of the bulb, and also at the top for hanging.  And that's it!  You did it!  Really simple!


Optional extra touches:

You could add a little charm on the ribbon if you would like

At the very beginning you could paint the back of the wedding invite a pretty color (silver, gold, etc.) before cutting out your strips, to have the inside part have a little pop.  (I didn't think of this until I was all done, Poo!!  I bet it would look awesome!)

You could paint the silver cap at the top just to add a little something..

So what do you think??  Will you give it a shot?

Our Pretty Little Girls

Thursday, November 20, 2014

DIY: Open When... letters


I've been seeing these "Open When..." cards all over Pinterest and I think they are the cutest and sweetest idea ever!  My husband is the romantic type so I knew he would love this.  

For the people who have never heard of this; you basically create a bunch of different letters for the recipient to open at different times.  You can also fill the envelopes with momentos, memes, candy, anything!  I also made my own envelops just to make them more fun looking then plain old white ones.  

As I was starting this project I realized that my printer was out of ink so I was going to have to create everything by hand.  I was going to fill them with a billion memes and cute animal pictures, so this was a HUGE bummer!  But I guess in the end it made it more personal anyway.


I thought I would share what I filled some of my envelopes with to give you an idea on how to start your own.  Above each picture I will tell you the "topic" of the envelope, and below I will share what I put in mine and give you a few more ideas!

 Open when....

You want to know how much I love you
 Inside: A list of 100 reason why I love you, folded handprint craft: on the front it says "I love you" and inside "This much", Coupon (for whatever you want), love quotes, picture from our wedding day, a personal love letter

You Can't Sleep
 Inside: Hot tea bag, goodnight kisses, a relaxing photo of us at our favorite place, the beach, with a little note of the back

You are super bored
 Inside: here is where it started to get really tricky...I found all of these printouts online BUT my printer wasn't working...so I made them by hand.  Excuse the sloppiness!  Mazes, puzzles, Crossword puzzle, Word search, Random facts

You want to feel like a Superhero
 My husband is a HUGE comic fan so this was a must!! lol!  Inside: I drew a picture of Spiderman and put his head on it, Spiderman mask, Superhero stickers, and a photo of memory of when he was my hero

You are feeling stressed
Inside: Bubble wrap with a note that says "Pop 3+ bubbles as needed", inspirational quotes, stress management tips, mini bottles of alcohol, Coupon for a free backrub, Hersey kisses

Here are a 15 more topic ideas:  Open when...
You need a confidence boost
You are mad at me
You are sick
You miss me
You feel sad
Things get tough
You are worried about the future
You want to know more about me
You're angry at the world
There is a zombie apocalypse
You're feeling naughty
 You need to feel appreciated
You're confused
You need a confidence booster
On special date/holiday/occasion

Have you ever made something like this?  If not, do you think you will give it a try?

linking up with: Modern Pilgrim, Sweet Bella Roos, Artsy Fartsy Mama, Just Us Four, Create With Joy

Friday, September 5, 2014

DIY Wedding card book


So it is no big secret that I am kind of a hoarder when it comes to keeping sentimental things.  That's why I was so excited when I came across this DIY on Pinterest for making a wedding card album.  I thought it would be a great way to keep them out with the rest of our wedding memorabilia on my shelves.

Just in case you haven't come across this amazing DIY project, I decided to show you how I made mine.  


Supplies:
2-3 pieces of scrapbook paper
hole punch
wide ribbon
thin ribbon (optional)
scissors
binder rings
big stack of wedding cards
a couple embellishments (you can use a picture of the two of you or pick up stickers from a craft store)
2 brads

Step One: Creating the front and back cover
Get all of your cards together.  Put them in a stack and pull out the biggest one.  You are going to use this as your guide for covers.  

Trace the outside edge of your card and cut it out. (Photo below) You are going to trace it twice, once for the front and again for the back cover.


Step Two: Design your front and back cover

Use anything you want!  I used leftover things from our wedding day.  The "label" on the front of my book is actually one of the extra water bottle labels.  The wide and skinny ribbons are leftovers from our favors.  They also sell SO MUCH wedding scrapbook stickers/embellishments at craft stores.

Step Three:  Hole punch your cards

This is kind of the annoying part.  I held my stack of cards together and found the middle of the smallest card, then I made to dashes where I was going to punch the holes.  I punched the holes in the small card first and then used that as my guide for the rest of the stack, punching one card at a time.  (And don't sweat it if you make a mistake and have to re-punch a hole because remember your cover is going to be over it anyway)

Step Four:  Feed the binder ring through the holes

I take it back, this was probably the most annoying part for me. haha!  Feed one ring at a time.  And you may need to feed it through each individual card if your holes don't line up perfectly.  (Mine didn't, but it still works!)


Step 5: Create the wraparound bow to hold it closed

On the BACK cover you are going to lay your wide ribbon across the back of your book, making sure it reaches to the front with enough room to tie a bow, and is even on both sides.  Once you have your bow in place, use scissors to pop a small hole through the ribbon and cardstock, and insert your first brad.  Move a couple inches from that one and add a second brad using the same method.  Bend the edges to adhere them to the page. (Photos below) Now wrap it around to the front and tie a pretty bow.


 Optional step:  I added a thin ribbon to my binder rings just so the weren't so plain.  I just tied cute little bows.  You could also attach a cute charm or keyring to jazz it up a bit if you wanted.

And you are ALL DONE!!  That wasn't so painful, was it?

What do you think??  Are you going to give it a try?

linked up at: Create With Joy, Oh My Heartsie Girl, Just Us Four, Diana Rambles

Thursday, May 29, 2014

DIY Baking soda and Orange juice mask

Warning!  These photos contain my face with no makeup whatsoever....  Be afraid... be very afraid!

I have always had problems with large clogged up pores on my nose and cheeks so when I spotted a few DIY face masks on Pinterest I decided to give one a try.  I saw this one from Beauty Bets and it seemed really easy and I already had the baking soda and orange juice on hand, so why not?!  The baking soda is supposed to fight acne and exfoliate, while the orange juice tightens your pores and brightens your skin.

I'm very happy with the results.  I have only done it the one time so I still have some gunky pores but they are no where near as bad and I'm sure if I keep using it that it would really help with that.  My face is so soft now and has a great healthy shine.


Here are the easy steps:
  1. Mix 1 tbsp real orange juice with 1 tbsp baking soda. Add more baking soda as needed to thicken mask ( I ended up adding much more than 1tbsp so it was nice and thick)
  2. Spread a thin layer on face.
  3. Leave on for 20 minutes
  4. Dampen finger tips and scrub mask in circular motions for extra exfoliation
  5. Rinse.
Before, during, and after the scrub photos.

It tingles a little when you first put it on and when it dries it gets a bit itchy, so I watched tv to keep my brain busy.  They also suggested that you try not to talk while it's one because it will chip and flake off pretty easily.

I put on a moisturizer afterwards because it did make my face feel a little dry.  Your face could also have some redness if you have sensitive skin (I didn't have any) but should fade within 20-30 minutes.

So, what do you think?  Are you going to give it a try?  What are your favorite beauty products/face scrubs?

linked up at: Linkn Blogs Link Party